
In many hotels the TV installation dates back to analogue television: an aerial on the roof, amplifiers in the technical cabinet and a coaxial cable to every room. It works – until the broadcasting standard changes, an old amplifier fails, or guests start asking why there are only a dozen channels on screen. The good news: an upgrade doesn’t have to mean breaking open walls or replacing everything at once. Here’s how to do it step by step.
Step 1. Audit what you already have
Before buying anything, you need to know what you are building on. An audit answers a few questions:
- What condition is the coaxial network in – are the cables and sockets fit for further use, and what are the signal levels in the rooms?
- Is there LAN cabling to the rooms, and how good is it?
- What TVs are in the rooms – how many, how old, and which standards do they receive (DVB-T2/HEVC, DVB-C, IPTV)?
- Where does the signal come from – a terrestrial aerial, satellite, an internet provider?
The results are often a pleasant surprise: the existing coaxial network can usually stay in use – and it is the most expensive part of any installation.
Step 2. Choose how to distribute the signal
There are two main routes, and both make sense depending on the building:
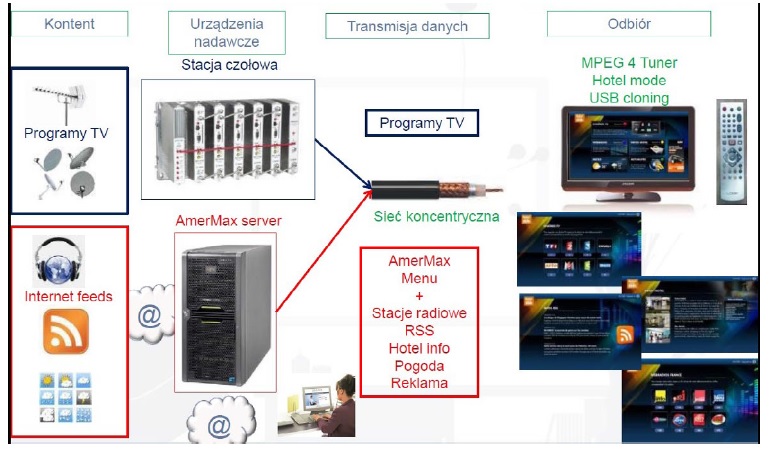
- Coaxial network (DVB-C or DVB-T) – a headend receives the channels and sends them over the existing cable. No building work, using the current sockets.
- IPTV over the LAN – channels travel over the same network as the internet. Convenient where there is new structured cabling anyway, and it opens the door to interactive services.
The two can also be combined – for example a headend with an IPTV input that feeds the old coaxial network.
Step 3. A new headend
The headend is the heart of the installation: it receives channels from the aerial, satellite or internet and prepares them in a standard the TVs in the rooms understand. Modern units such as the Kathrein UFO Compact Plus or our own AmStream have one important feature: they are managed remotely. When a broadcaster changes its parameters, you don’t have to retune every TV, and many faults can be fixed without a technician visit.
A well-chosen headend can also give older TVs a new lease of life by converting the DVB-T2/HEVC signal into a standard they can receive (more in our article DVB-T2 HEVC in hotels).
Step 4. The channel line-up
An upgrade is a good moment to tidy up the channels: match them to your guests (e.g. international news for business travellers, cartoons for families) and make sure they are licensed for hotel use. You’ll find the available packages on our TV channels page.
Step 5. TVs – in stages, not all at once
Once the headend delivers a signal your current sets can receive, replacing the TVs can be spread over time: start with higher-category rooms or the oldest sets, and replace the rest during later refurbishments. Our hotel TV buying checklist will help when you buy.
Step 6. An interactive layer (optional)
Once the basics work, you can add a welcome portal, information about hotel services and your own promotional channel. Systems such as AmerMax use the existing coaxial network and need no set-top boxes in the rooms – often the cheapest way to make the TV start paying for itself.
Step 7. Testing, documentation and service
- Measure the signal in the rooms when the work is finished, not just in the technical cabinet.
- Keep up-to-date documentation of the installation – it will help with every future change.
- A service contract and remote monitoring of the headend – you see a fault before a guest reports it.
Summary
Upgrading a hotel TV installation usually starts with an audit and a new headend, not with replacing every TV. The hotel quickly gains new channels and a reliable signal, and can spread larger costs over time. We’ll be happy to audit your installation and propose a step-by-step plan.